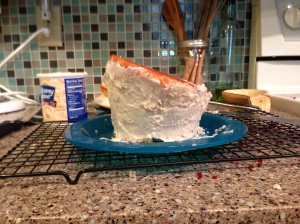
Last year for Em’s first birthday party I made a rainbow cake that turned out really well. (I’d provide a tutorial but there’s already a ton of them out there and I don’t think I really have anything to add other than “Go for it!”). Anyway, this year I have set my sights high on a topsy-turvy cake for a Cat in the Hat themed party (I’ll share more Can in the Hat inspiration and party planning goodness later). But, it’s pretty ambitious for me, so this weekend I decided to make a practice cake.
I read a few tutorials online and thought “bake, cut at an angle, stack, frost, I can do that!” Hmm.. yeah, it didn’t come out quite like I’d planned… Hopefully you can learn from some of my mistakes:
I started out using two different boxed cake mixes (yep, boxed cake, that’s how I roll). I already had the white cake mix on hand and I wanted to test to see if I like the red velvet mix. So, anyway, I made the red velvet mix according to the instructions on the box and baked it in two 9″ round pans. Here they are baked and cooling (little tip: if you cool them upside down they flatten out a little and you don’t end up with quite so much you have to cut quite as much off the top).
Then I got the white cake mixed and in the oven. One box was the perfect amount for 3 layers in 6″ round pans. While the little cakes were baking I worked on stacking the larger cakes to make the bottom tier. I trimmed the dome off the first cake and then sliced the other at a diagonal. I didn’t think leaving the dome on the second cake would cause a problem. But, it did. I ended up using some of the excess I’d cut off the top of the first cake to fill in and it worked okay. But, certainly starting with nice flat cakes would be easier. I just hate seeing those domes go to waste! Here’s how it looked stacked and then with aquick crumb coat:

I followed the same steps for the 6″ cakes. I made sure to cut off the tops of the cakes this time and it made it much easier. I also trimmed around the base some so that it tapered in towards the bottom. I got a little heavy handed with my trimming but it turned out okay. Here it is:
:

Then everybody got to hang out in the fridgerator for awhile while I went and picked up my car from getting new brakes. I was nervous about how stacking the cakes would go because you have to cut out a portion of the lower tier so the top can sit on a flat area. Fortunately this wasn’t too hard. Honestly, I just eye-balled it and got pretty close. But, I’ll probably be a little more exact and use a piece of paper cut to size as a guide for the real thing. I also used a few wooden skewers that I had on hand to help hold everything together.
Then I just iced it as smoothly as I could (I don’t do fondant!) and even piped on a quick border. I’m certainly not an expert piper so I may do something else for the actual cake. But, the contrasting color made a HUGE difference in the look of the cake and helped emphasize it’s topsy-turvy nature. Overall I was pleased with the outcome (considering I’ve NEVER attempted this and I wasn’t sure what I’d end up with at the end).
A few lessons learned for when it comes time to make the real one (afterall, lessons learned was the whole point of this exercise).
-The proportions of the cake weren’t quite right, I felt it needed to be taller and thinner. To accomplish this, I plan on using 8″ cake pans next time instead of 9″ rounds for the bottom tier. I will also use a 3rd box mix so that I have an extra layer for each tier (3 layers on bottom and 4 layers on top). Unfortunately, I may have to expand the guest list because I was also planning on having cupcakes. And 4-5 boxes of cake for 25 people is a bit absurd…
-The white cake was easier to work with. It wasn’t as dense and didn’t fall apart or crumb as easily. I’ll use all white cake for the topsy-turvy cake and red velvet for the cupcakes (this was my plan anyway but the practice cake confirmed it).
-As with all baking: go slow and don’t cut corners. I think what I like about baking (and what so many other hate) is the meticulous nature of it. The little things make a huge difference: cut parchment paper for the bottom of the cake pans, allow the cakes to cool completely before cutting them, put them in the refridgerator or freezer before sculpting the cake or stacking them, use support structures within the cake, etc. All those little things people do on TV… yeah, there’s a reason they are on TV…
-Buttercream is never going to have the smooth finish of fondant, either get over it or learn to use fondant. Actually, maybe there is a tutorial on that somewhere. I know what I’ll be researching on my lunch break tomorrow…
So, that’s it. If anyone has any tips or tricks they’d like to share on making topsy-turvy cakes, I’d love to hear them. Now I just have to figure out what to do with all my practice cake. Maybe I’ll bring it up to work. Gotta love working with nearly all men, something tells me they won’t care that it doesn’t look quite right! =)


